How to Install a Water Submeter (of any type)
Articles


How to Use This Guide
We made this guide because installing water submeters varies a lot by meter type. The steps, tools, and time are different. That may not matter for one or two units. For hundreds of units, install time becomes a real cost. Scheduling, shut-offs, and rework can add up fast.
- Start with the comparison table to see how the options stack up on install time, tools, and disruption.
- Then jump to the section that matches what you are considering for your property and walk through the checklist and short how to video.
- That will give you a realistic feel for what your crew will be doing on site, unit by unit.
If you are still deciding between meter types, read through the sections in order. You will see where installs tend to slow down, where shut offs are required, and where scheduling or rework can creep in at scale.If anything is unclear or you want to talk through your specific layout, reach out to our team. We are happy to help you pick the simplest path and plan your install.
If you want background first, start with the Ultimate Guide to Water Submetering. It covers key terms, common rules, and billing basics.
Table of Contents
Quick comparison of submeter types
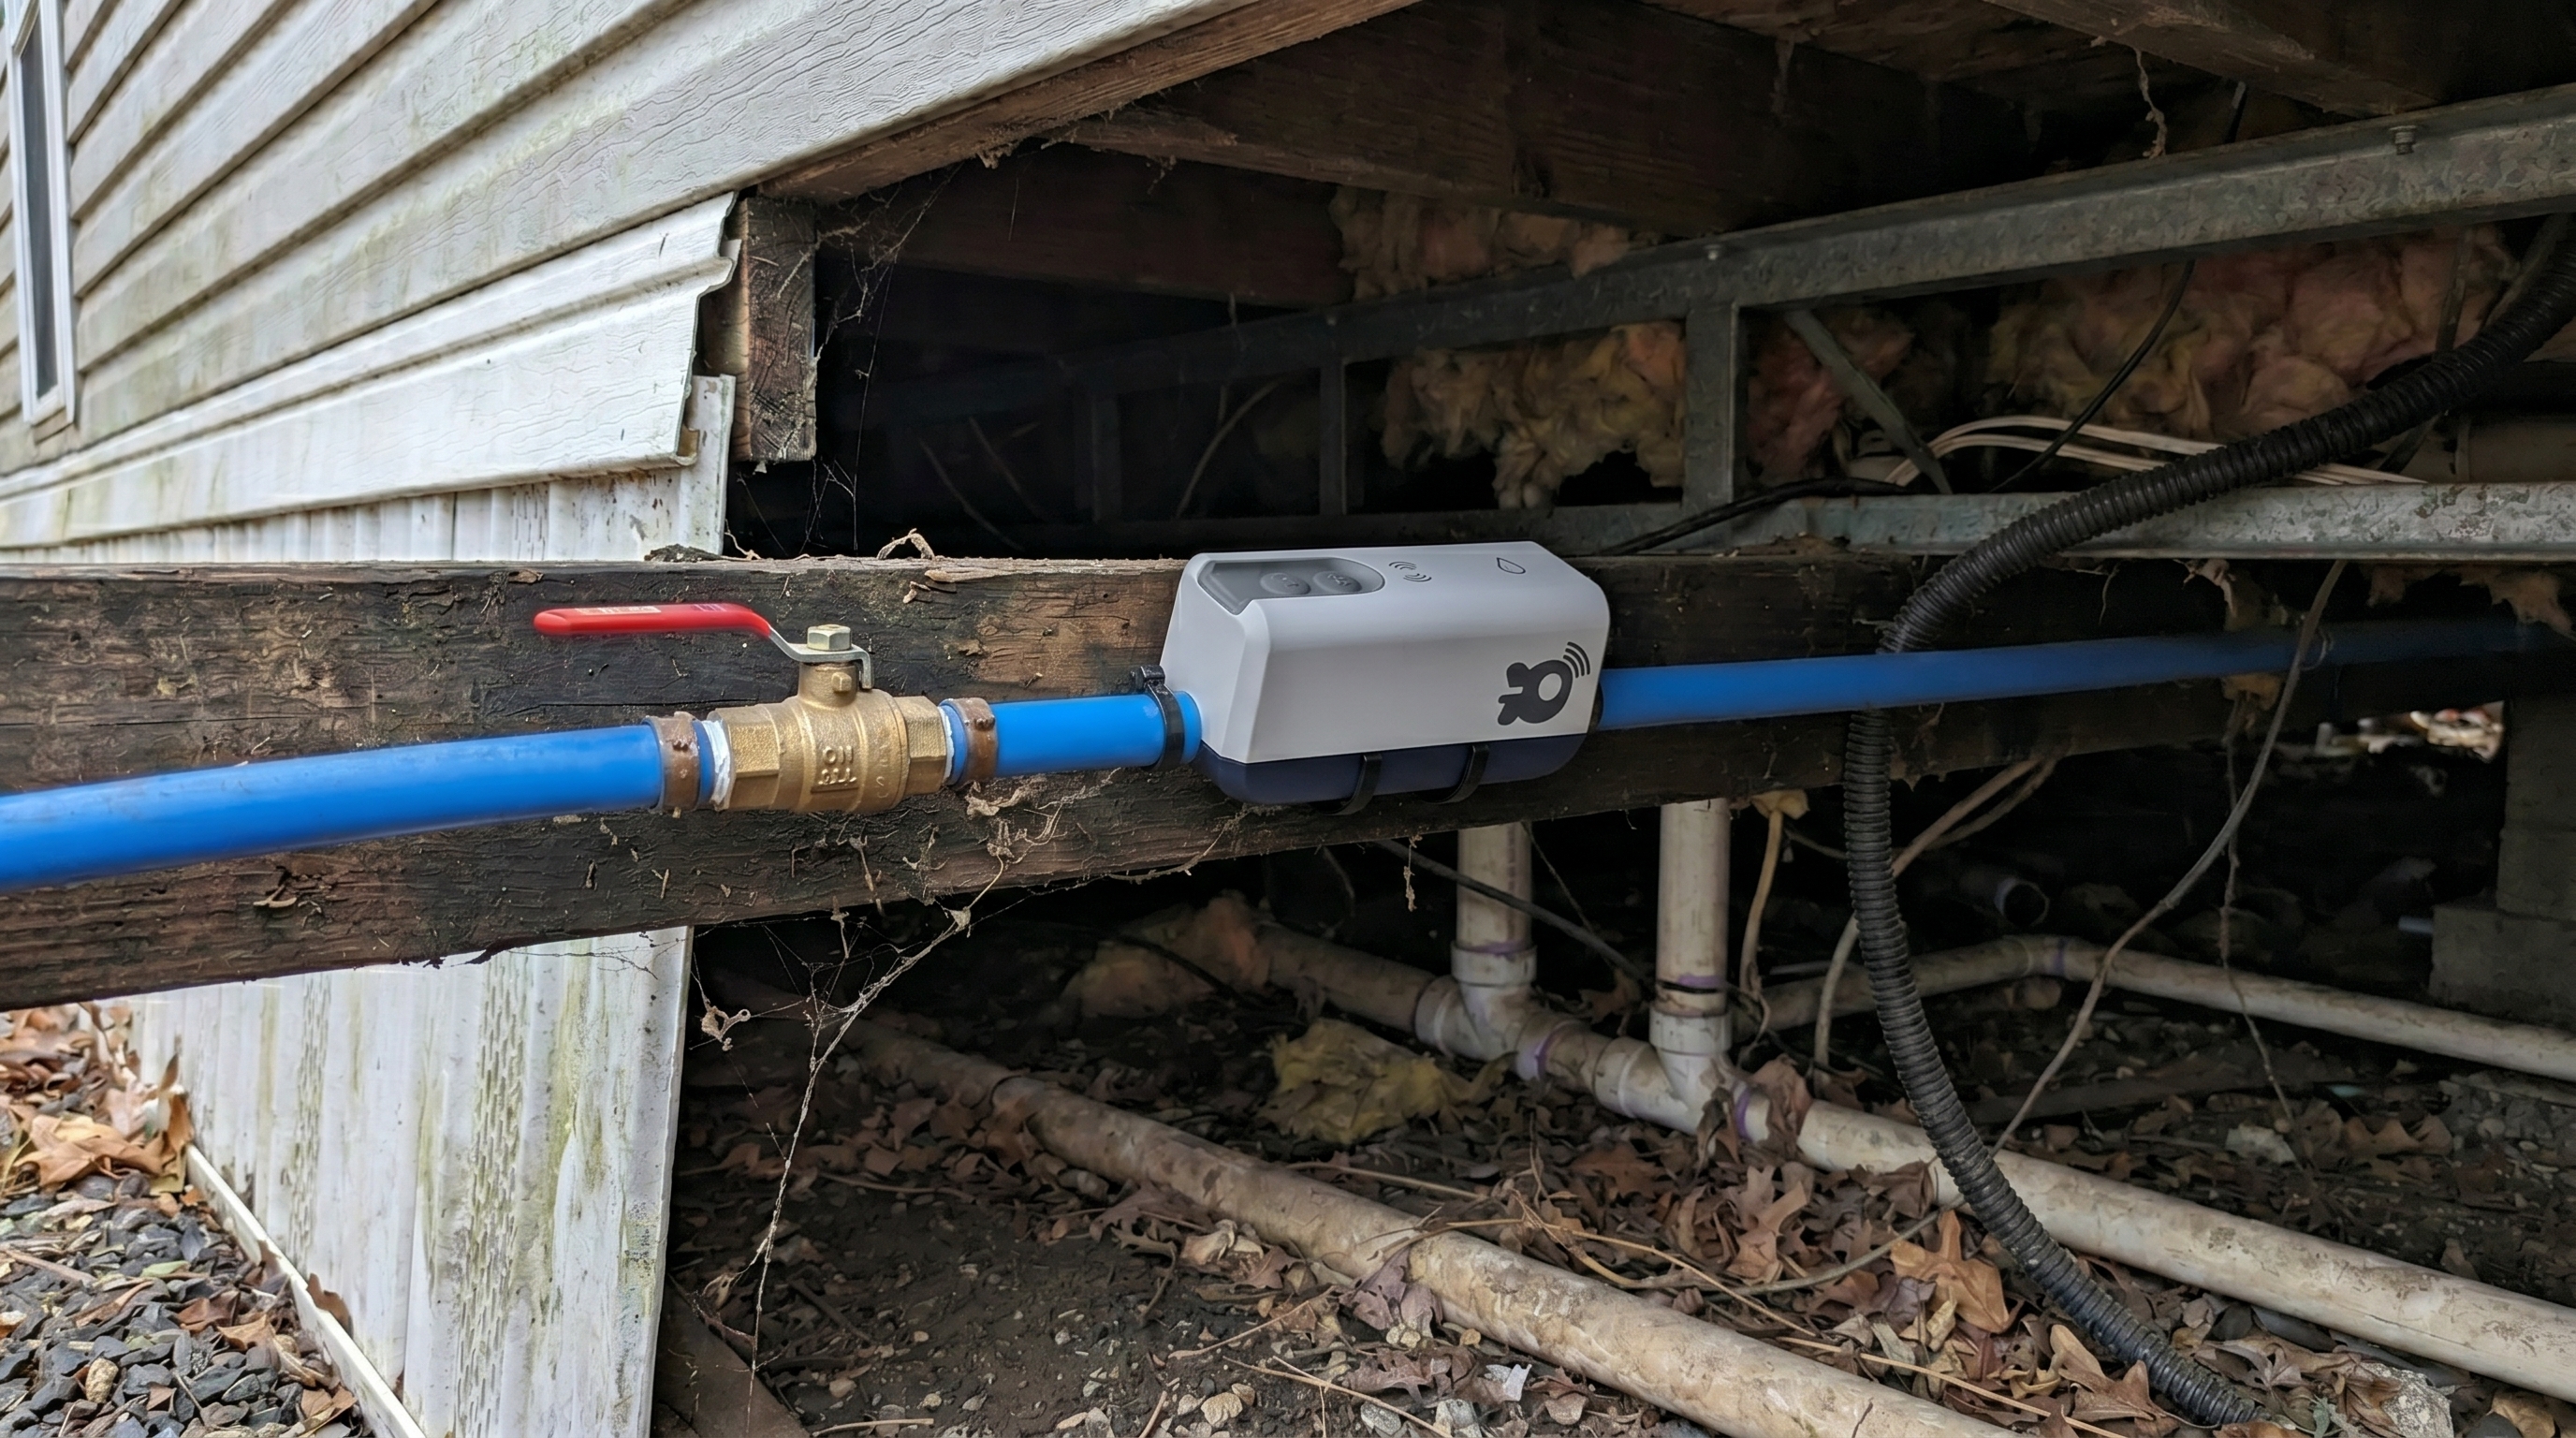
1. How to Install Over-the-Pipe Cellular Submeters
Ease of install: 5 of 5 (very easy!)
These clamp onto the existing pipe. No cutting. No shut-off. With SimpleSUB, devices ship pre-programmed to your unit in the cloud and use built-in cellular, so there is no Wi-Fi, no gateways, and no power hunt. See the SimpleSUB solution overview.
What you need
- Adjustable wrench or nut driver
- Cleaning cloth and zip ties
Install steps
- Locate the cold water service line after the unit shutoff or at the point of entry. Choose a straight, clean section of pipe with at least 6 inches of clearance.
- Clean the pipe with a dry cloth so the sensor seats flush.
- Place the meter (with flow direction arrow aligned) & attach zip ties. Tighten by hand, then use the tensioning tool to activate.
- Look for two green LEDs. Confirm status in the web app, and you're good to go!
Pitfalls to avoid
- Mounting on elbows or immediately after valves. Move 6–12 inches from fittings.
Why property owners like it
- No shut-offs means no resident scheduling.
- Cellular avoids Wi-Fi passwords and churn.
- Cloud setup is automatic. You get alerts and bills in the dashboard.
- Proven ROI in months when leaks are found. See the $35k savings case study from a mobile home park here.
Install Video
2. How to Install Over-the-Pipe Wi-Fi Submeters
Ease of install: 3 of 5 (moderately easy)
Same clamp-on concept, but you must join each device to Wi-Fi and ensure reliable power.
What you need
- Tool list from the cellular section
- Pipe size gauge or tape measure
- Phone to scan QR code & set up app
- Nearby outlet or battery plan
- SSID and password for the property network
Install steps
- Site survey. Check Wi-Fi signal at the pipe location. Aim for at least two bars on a phone.
- Download the App & Create an Account
- Set up your Device & connect to Wifi. Make sure you have power near by.
- Clamp the device per the cellular steps.
- Provide power. Plug in the adapter or insert batteries. Cable-manage to avoid tripping or moisture.
- Join Wi-Fi using the vendor app. Document SSID changes for future maintenance.
- Test flow and confirm data in the portal.
Pitfalls to avoid
- Using resident Wi-Fi. When residents churn, devices go offline. You'll need to set up your own wifi network.
- Mounting on elbows or immediately after valves. Move 6–12 inches from fittings.
- Stretching power cords across access areas. Use proper routing and drip loops.
- Steel or concrete closets that block signal. Move the clamp to a better RF spot or add access points.
When it fits
Small properties with strong, centrally managed Wi-Fi and easy power access. Possibly single family homes. Not a great fit for properties with multiple units.
Install Videos
You'll have 3 separate steps to install:
3. How to Install In-Line Mechanical Meters
Ease of install: 2 of 5 (difficult)
These replace a section of pipe. You must shut off water and cut the line. Mechanical dials can be read on site or pulsed to a reader.
What you need
- Permits if required in your locality
- Line shutoff access and drain plan
- Pipe cutter or saw, deburring tool, fittings, and sealant
- Wrench set, thread tape, and a bucket
- Optional: pulse cable to a remote collector
Install steps
- Notify residents of a planned shut-off window.
- Close the unit valve and open a faucet to drain pressure.
- Measure twice. Mark the cut length to accommodate meter body and unions.
- Cut the pipe and deburr ends.
- Dry fit the meter with arrow in the flow direction. Confirm clearance to read the dial.
- Seal and assemble using approved tape or dope. Tighten unions to spec.
- Slowly reopen water and check for leaks.
- Record baseline read and, if pulsed, connect to the collector and test.
Pitfalls to avoid
- Installing backwards. Always follow the flow arrow.
- Overtightening unions which can crack plastic bodies.
- Skipping permits where required. Some cities require inspections.
When it fits
Retrofits where only dial reads are needed or when a spec specifically calls for in-line metrology.
Install Video
4. How to Install Smart In-Line Meters
Ease of install: 1 of 5 (very difficult)
These provide advanced analytics and often require continuous power and data. They still need a pipe cut and shut-off.
What you need
- Everything from mechanical installs
- Power source and disconnect
- Network plan for Ethernet, gateway, or certified cellular module
Install steps
- Scope power and data first. Confirm code-compliant outlets or PoE.
- Shut off and cut the pipe as with mechanical meters.
- Mount the smart body with gaskets or unions per the manufacturer.
- Wire power in a dry, protected enclosure.
- Connect data to LAN, gateway, or a cellular uplink.
- Commission with the vendor software.
- Verify with a controlled flow test and compare to a known volume, like a 5-gallon bucket.
Pitfalls to avoid
- Putting powered electronics in damp pits. Use rated enclosures.
- Ignoring backflow and code clearances. Check local rules.
- Forgetting surge protection and bonding.
When it fits
High value mains, commercial risers, or projects that need granular signatures and alarms.
Choosing the right path for your property
Use the table above and ask three questions.
- Can I avoid cutting pipe and scheduling shut-offs? If yes, favor over-the-pipe.
- Do I want to avoid touching resident networks? If yes, favor cellular.
- Do I need speed across many units? If yes, choose pre-programmed, no-power devices like SimpleSUB cellular.
For proof, see how a community eliminated waste and reduced headaches in this Oklahoma case study and how Weber Properties boosted efficiency with SimpleSUB Water.
Planning tips for a smooth install day (regardless of meter type)
Map your inventory
Create a unit list with pipe locations, sizes, and photos. Attach it inside the SimpleSUB dashboard so installers know exactly where to go.
Pre-label everything
Label devices with unit numbers before you step onto the property. With SimpleSUB, units arrive pre-assigned in the cloud, which reduces errors.
Stage access and communication
Post notices if you must enter utility closets. Cellular over-the-pipe installs usually avoid resident scheduling because no shut-off is needed.
Simple ROI math you can trust
Here is a quick example.
- Property size: 60 units.
- Known average water bill: $85 per unit per month.
- Target recovery by billing residents at fair share: 60 percent to 80 percent of the bill, depending on conservation response.
If residents pay for usage and reduce leaks, owners typically recover a large portion of the monthly spend. A rough back-of-the-napkin view:
- $85 × 60 units = $5,100 total monthly bill.
- Recover 60 percent through resident billing and waste reduction. That is $3,060 per month.
- If your total metering program costs the equivalent of $1,000 per month across hardware and software, net savings is about $2,060 per month.
Your local laws and lease language matter. Always confirm local billing rules. For examples of real results, see the park that saved over $35,000.
Where SimpleSUB changes the calculus
- Clamp-on install with no cutting means fewer headaches and no water shut-offs.
- No power hunt because devices are self-powered.
- Cellular connectivity avoids Wi-Fi churn and complex gateways.
- Simple cloud dashboard for billing, leak alerts, and reporting. Start here: SimpleSUB Solution.
- Quick ROI proven in parks, apartments, and small commercial suites. See the Ultimate Guide for more context.
FAQ for first-time installers
Do I need a plumber for over-the-pipe meters?
Usually no. A maintenance tech can follow the checklist and your video. Always follow the device manual and local policy.
Do I need a plumber for inline meters?
Usually yes. You'll be cutting pipe, and will need to ensure that there are no leaks when you turn on the pipes again. Always follow the device manual and local policy.
What pipe materials are supported?
Most clamp-on sensors support copper, PEX, and CPVC. Verify rating for galvanized or old steel. If the pipe is heavily corroded, clean it first.
What if a unit has weak cellular signal?
Try moving the clamp to a higher or less obstructed spot. In edge cases, a small external antenna or a different carrier device can help. SimpleSUB can advise.
How do I bill residents fairly?
Use the SimpleSUB dashboard to generate reads and reports. Coordinate with your property management software and follow local rules.
Disclaimer: SimpleSUB’s water submetering and billing features may not be permitted in all states or local jurisdictions. You are solely responsible for ensuring that your use of any billing or cost-recovery tools complies with all applicable laws and regulations in your area. Nothing on this page (or elsewhere on our site) should be considered legal advice. You should consult your own legal counsel before implementing any billing practices.
Request a Demo
We’ll design an affordable, easy-to-install solution for your submetering project, large or small.
Read Related Articles

Ultimate Guide

Articles
Articles

